Club Apiary Journal for 2013
by Caroline Abbott
October 12, 2013Today was our last field day of the year. We had about 20 people in attendance. Our purpose was to prepare our hives for winter. The day before the field day I had gone out to the hives to start preparations just in case the weather wasn’t good on Saturday. The weather man was wrong, as usual, and it turned out that the weather was beautiful for the field day, but I couldn’t be sure, this is October in Michigan, after all. When we approached the long hive on Oct. 11th, there was a lot of unusual activity, bees going in all the upper entrance holes from the inner covers. When we got up to the hive we saw way too many dead bees on the ground and lots of wax particles all over by the entrance and on the ground. This was a very bad sign and we knew immediately that something was very wrong. The next clue was yellow jackets entering the hive at all entrances without challenge. My heart sunk, these are tell-tale signs of robbers who have completely taken over a hive that is no longer alive, or at least not viable anymore. So, we opened the hive to see how bad the damage was. It was the worst case of robbing I have ever seen. Every single frame was completely empty, even the four frames I added for winter “insurance”.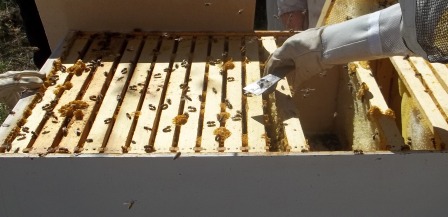 So sad! I had 24 hours to think about this before the field day to evaluate what went wrong. First of all, I believe I created too much area for robbing by putting the notched inner covers on two weeks earlier. This gave the hive too many holes to guard and the robbers were able to overwhelm the hive. But, even so, if the hive was strong to begin with, it could have fended off the robbers. So the reality was the hive was weak. Beekeeping is part detective work, so you have to look at the clues. This is why I keep this journal and also a journal on my personal hives. It is a good habit so you can go back and figure out what went wrong so you can prevent it the next time. You may not always figure it out, but keeping notes will be a help. A month ago they had two frames of capped brood. Was that enough, or not? Ten days later when we opened the hives with the K-College students the brood was emerged, but there was no open brood, meaning eggs or larva. I assumed it was due to the lateness of the season, but in hindsight, there probably should have been some open brood at that point. The bees were in a good mood, which I thought meant they were queen-rite, but, then again, they are Carnolians, which are gentler, and they may have been too weak to even be agressive by that point. All this means the hive could have gone queenless as long as six weeks ago. We could have accidentally killed her during a hive inspection, or who knows what. The presence of varroa and small hive beetles on the bottom board was probably a warning sign that the hive was weak for some reason. I believe these pests are opportunistic and are a symptom of a weak hive, not the cause of it. Most likely the hive became queenless and weakened, then couldn’t fend off these pests which are always around waiting to attack weak hives.
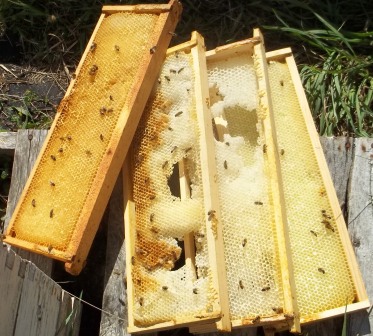 So, what caused the hive to weaken, I am not sure. Did we accidentally kill the queen and not realize it? Again, I am not sure. I am sure that creating more holes in the hive speeded up its demise because the robbers came in and completely emptied it out. Here are the four medium frames that had been full of honey that I had added to the hive. The two with holes chewed through them are foundationless. This severe damage was most likely from yellow jackets. There is good news about all this. If we hadn’t discovered this hive was functionally dead, we would have prepared it for winter and would have thought it didn’t overwinter due to the hive design or some other factor. This way, we know it died before winter and we just took precautions to protect it from mouse damage and then closed it up to preserve what comb is left to re-use next year. We figure it will get colder faster outside than in a building, so wax moth damage will be limited. My preference is to attempt to split the other hive if it overwinters well and re-populate this hive with that rather than bringing in new bees again, but of course, that is completely dependent on how the other hive overwinters. Life is a learning experience and you can’t learn if you never experience any failure, but it doesn’t make you feel much better about it!
The vertical hive, however, looked very good. The top super is mostly full of honey, not fat combs, but the one below is completely stuffed with ten, fat combs, so we are confident it has enough honey for winter.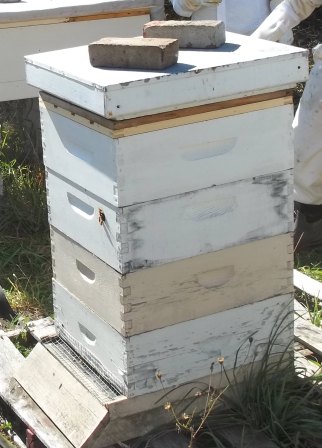 We turned the notched inner cover, which we had modified with six notches total, upside down, so the bottom of the inner cover sits on the top bars, making the bees have to go through the hole in the inner cover to enter. Since we wanted to put some kind of insulation in the top, we needed to put a regular inner cover on top of the notched one to create air flow and space for the bees to enter and leave, or else the insulation would have blocked the holes. On top of the regular inner cover we put a spacer about 2″ high that had been cut from a deep hive body to make it into a medium. We put an insulating blanket in the hive. If we had put a window screen on the bottom of our spacer, we could have used wood chips or other absorbant material. Although the idea of two inner covers seems awkward, it is more stable than our old system of leaving sticks under the top cover for ventilation, but gives the same effect. It also makes it more mouse protected. Lastly, we stapled 1/2″ hardware cloth over the entrance of the hive to keep mice out. The hive, all ready for winter is pictured at the right. We do have a rather large upper entrance hole from a previous year in the second super down from the top. We may put a piece of 1/2″ hardware cloth over that if we think mice might be able to enter through it.
September 28, 2013We went out to prepare the hives partially for winter, we will do the rest on the next field day. Today we put notched inner covers on both hives for ventilation and upper entrances for winter. We put a spacer the same size as a hive box (a long one for the long hive, a regular one for the vertical hive) over the inner cover. The spacer is around 2″ tall, and has enough room to place an absorbant blanket to insulate and absorb moisture. We will wait to add that until the weather gets colder. We took a regular notched inner cover and added extra notches for air flow, a total of six on each inner cover. We think it will be fine for the vertical hive, but may be too much for the long hive, since it has a total of three inner covers. We will assess that at the next field day and change out the inner covers if neccessary. We stapled a canvas cloth onto the top cover of the long hive to protect it from weather and make it more winter ready. We also gave the long hive four frames of honey from another hive, just in case we had taken too much. We put them directly behind the last frame with any significant amount of honey in it. The frames were mediums, two were foundationless, but straight, two had plasticell under them. We thought the frames were getting a little bit curvy the further out they went, so having a few straight frames to guide off of might help with that. On the next field day we will add mouse guards and add the blankets if we think it is cold enough.
September 24, 2013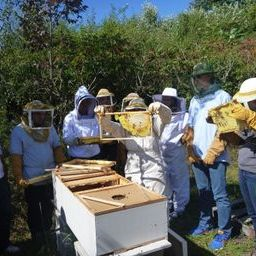
Today Ann Fraser’s entomolgy class from Kalamazoo College came out to the club hives for a special field day. It was a beautiful day for it, considering the lateness of the season. It was around 70 degrees and sunny. The smoker was going good, which meant the bees would be calm, and they were. We opened the vertical hive first. The top box was mostly full of honey, with only the outside frames empty. The combs were not fat, but did have honey in them. The smell of goldenrod was very strong. We took that box off to look below at the next box down, and it was completely full of goldenrod honey, each frame fat and packed, all ten frames. That satisfied us that that hive is ready for winter. It certainly has enough stores.
Next we opened the Long Langstroth hive. We checked in the back where the mouse nest had been started the last time we opened the hives. We found a nest of baby mice, all but one dead, with dead bees all around them indicating the bees had stung them to death. One frame was damaged, completely chewed through by momma mouse. We pulled the baby mice out and replaced the frames. We continued with the inspection of the hive and while we were doing so, one person saw the bees actually pushing another dead baby mouse off the front entrance porch. That was four feet across the hive floor from the mouse nest! We found the bees had packed more honey in since the last field day, and also that all the capped worker brood we saw then had fully emerged and they were backfilling those combs with honey. It looks like they have enough for winter, but just to make sure, we will add a few frames of honey from another hive just in case they don’t have enough. After closing up the hive, we checked the front bottom board and found it did have a lot of varroa and some hive beetles and a few wax moths on it. After seeing what they did to the mice, though, my thoughts are that this is an indication that they are hygenic bees because they are vigorous and healthy and we haven’t seen any of these pests in the hive itself. Our next step is to put better inner covers on that have ventilation too small for a mouse and to raise the lid with a frame that has no openings in it for mice to get in. For winter we will place a blanket for moisture control and insulation in the frame on top of the vented inner covers. We will also put some 1/2″ hardware cloth over the entrance to keep the mice out.
September 14, 2013We had approximately 18 people in attendance at our September field day. We had another great day for weather, inspite of a cold morning start, it was close to 70 degrees and sunny, very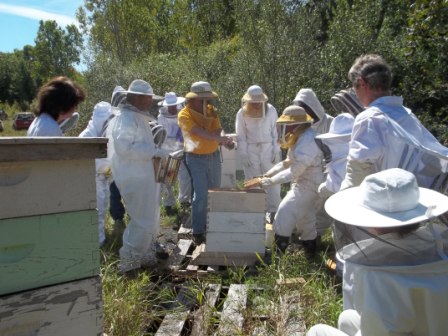 pleasant when we opened the hives. Caroline Abbott and Ken Hoekstra opened the hives and discussed them with the group. We first opened the hive that had swarmed and found it completely empty, not even any honey, all robbed out. Wax moths had already moved in, which gave those in attendance an opporutnity to actually see a wax moth, the wax moth tunnels in the comb and the webs. It was very educational. We took that equipment down and stacked it by our empty equipment. We know the wax moths will certainly do more damage before it gets cold enough to freeze them out, but it is mostly plasicell foundation, which can be scraped down to the foundation. We also hope to start fresh with foundationless frames next year in our club hives, so we are not going to get too concerned about it at this point.
We next opened our split hive which is in traditional, vertical equipment. The top box was completely empty with empty foundation. We took it off and stored it in our storage pile. The next box down was almost completely full of honey, which we left on for winter stores. We did not look in the three brood boxes below. We will save that for next month when we prepare for winter. Our goal is to not have to feed any sugar water, but to have enough honey on the hive for winter. We will install mouse guards next month.
Next we opened our Long Langstroth hive. 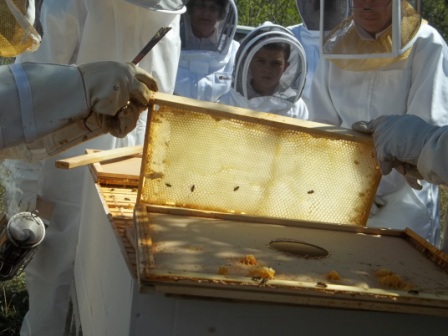 The bees had not expanded any further in the hive, but that is to be expected this time of the year. They are contracting down for winter. The three drawn combs we extracted and returned to the hive last month were examined. All three had been strenghtened and repaired where there were cracks from extracting. The furthest back from the brood nest was empty, the next closer had evidence that brood had been raised in it since we returned it, but was empty. The closest one to the brood nest did have un-ripe nectar in it, mostly filled back up. We noticed some debris in the bottom of the hive in the back third and upon investigation decided a mouse had entered the hive and started gathering materials for a nest. We cleaned it out and made sure we put flatter ventilation sticks in so hopefully there wasn’t room for a mouse to get in again. The top cover needs to be better prepared for winter. Ken Hoekstra suggested we cover it in canvas for a temporary fix. Since we don’t have another cover to place on the hive while we fix it, it has to be something we can place on the hive in position. He also is going to cut a solid plastic sheet for a more stable bottom board for winter. We will be able to slide this in on the groove that is in the bottom board with no disturbance to the bees. We decided to pull out the front bottom board under the brood nest which is under a screened bottom board just to check for mites. There were a lot of mites on the board, but none visible on the bees or drones or drone brood. The mites were an accumulation from the entire season because we had not checked it previously. Since we don’t do mite counts on the other hives, we are not sure if it is significant or not. The bees looked healthy and strong and had a lot of capped worker brood in preparation for the winter generation of bees to cluster. Caroline will go back in a few days to a week and check the bottom board again for a comparison. When we check next month, if we are at all concerned that we took too much honey off the long hive for it to overwinter successfully, we will put some honey from another hive on it for additional stores. The weather is already cooling off, and although there is a lot of goldenrod and aster blooming, there has already been one light frost, so we are not sure how much viable forage is left for them to collect.
After finishing at the apiary, we went back to Caroline’s garage and discussed wax rendering. Three different methods were discussed and demonstrated. The club has two wax molds available for rental for a minimal fee if anyone wants to borrow them for their own wax.
August 10, 2013We had about 25 people in attendance at our August field day. Ken Hoekstra and Caroline Abbott opened the hives. We checked the weak hive that had swarmed first. We found it almost completely empty, with just a few bees still thinking there was some reason to be there. We will just let it go. It doesn’t even have any honey to rob out. At least someone somewhere got a nice swarm out of it, so they helped to strengthen the genetic pool in our area.
The other overwintered hive looked great. 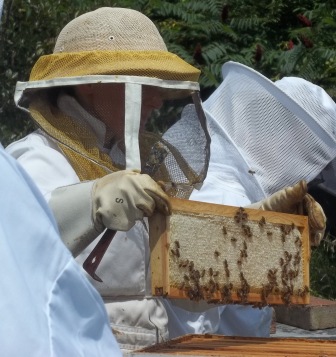 We had collected 10 frames of honey off it last month. We were able to collect nine more this month. The tenth frame wasn’t drawn out on the side toward the wall, so we turned it around and gave them empty foundation to draw out so we have some nice, clean comb for next year. We did not put foundationless frames in that hive yet. We will wait until next season since it is midway through the season now.
The Long Langstroth hive looked good, but had not moved out any more since last month. After the field day was over, it occured to me that I had removed the bottom board in the back to give them more ventilation. They had not moved into that area at all. There was also some mold on the top cover in the back over that area. Looking back, I realized they probably had it too open and moisture had crept in from all the rain we got. To correct that situation, I went back out a couple of days after the field day and replaced the bottom board so it is closed off again. The bees seemed to appreciate that. We collected six full deep frames of honey, completely capped, all natural comb. We sold 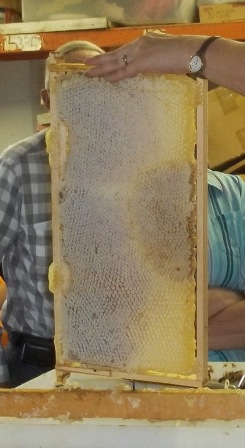 one as a full frame of honey, we cut two up for cut comb honey, and the other three we SUCCESSFULLY extracted without the comb falling apart. When I went into the hive to replace the bottom board, I also returned the empty comb to the hive. The bees seemed very grateful! It will be interesting to see how it looks next month. Now we have club cut comb honey available for sale which is completely natural, no foundation at all. It is really pretty to look at. We also have liquid honey in one pound containers for sale.
July 18, 2013Update on the foundationless frames: We took three foundationless medium frames which were attached on all four sides. We successfully uncapped them with an uncapping knife, and, YES!! we successfully extracted them without damaging the comb!!! We discovered that if we spun slowly, then gradually increased the speed, left it at a steady speed while extracting, then gradually reduced the speed until it stopped was less stress on the frames, and we were able to spin them as fast as frames with foundation if we used that method.
July 13, 2013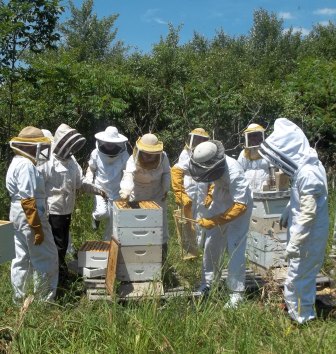
We had a beautiful summer day to open the hives today. There were around 20 people in attendance. Many were brand new to beekeeping and had never attended a field day before. Ken Hoekstra and Caroline Abbott opened the hives. The first hive we opened was the overwintered hive to the north, which had been split and made its own queen. Both Ken and Caroline noticed that it had very little activity on it before opening the hive. We found no brood but a few drone cells, although the bees were not terribly grumpy. We suspected they had swarmed. As we dug further, we found several queen cells. We did damage two of them, but noticed more that were undamaged and fully capped, so we closed the hive up and left it be to see what happens.
Next was the other side of that split, which last month we found queen cells in and expected it to swarm. Well, the bees don’t read the 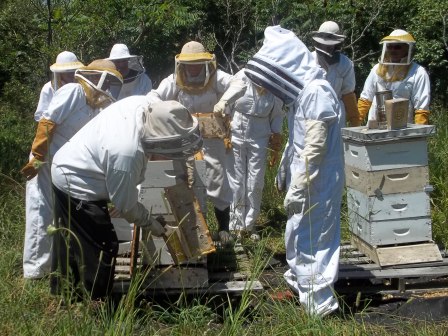 books, and apparently the other one swarmed and this one went to work making honey! The top box was empty plasticell, but the next box down which had empty drawn comb last month was full of honey. It was not capped, however, so we looked down further. The next box was completely full of honey and completely capped, all ten frames. We removed them one by one and brushed them and put them in a box to take back and extract. The next box down still had some brood in it. We put the empty plasticell box down by the brood nest and put the full super that needed to be capped on top and closed up that hive.
Now, the Long Lanstroth hive! As soon as we opened it, we could tell the bees were already just beginning to move out to the final third of the hive. We removed the middle inner cover and counted how far they had progressed. They were working on the 24th frame!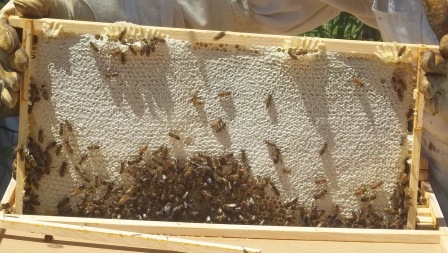 We took it out to look at the bees working on the frame, and began to carefully detach the combs and lift them out to look at them. The honey combs were attached on both sides, full of honey – very heavy – we estimate around eight pounds. There were around ten of these full honey combs. None of them were 100% capped, so we left them all for now. We will eventually collect some, we will determine how much to leave on for winter and only take the extra. It appears they have only a little brood left in the frames at the back of the brood nest, which we assume they will fill up with honey when the brood emerges. We put everything back in the same order we took it out and closed the hive. We then removed the bottom board in the back third of the hive which was blocking the screened bottom board, to give them some more ventilation. This is the same amount of ventilation the other hives have, the equivalent of one normal bottom board.
After the hive inspection, we went back to Caroline’s garage and uncapped and extracted three of the frames which we had collected. We also cut natural comb out of a foundationless frame from Caroline’s hive and set it to drain for cut comb honey. Everyone tasted the honey, which we know is Basswood honey because of its distict taste. The comb honey was also very light, indicating it was pretty much pure Basswood. As an experiment, Caroline is going to attempt to extract a few foundationless medium frames from her hives to see if they can withstand the extractor. She will use only the ones that are fully attached on all four sides of the frame. Stay tuned for the results of that!
June 15, 2013Today was our club field day for June. There were around 17 – 20 people in attendance, including several children. Ken Hoekstra and Caroline Abbott opened the hives and explained to those in attendance what we were seeing. We opened hive #1 first, the overwintered Carnolian hive that raised its own new queen. It had three medium brood boxes stuffed full of brood and a completely empty super of plasticell foundation on top. We removed the empty super and replaced it with a super of empty, drawn comb. The Carnolians obviously do not like plasticell, and will refuse to draw it out. Hive #2 was in exactly the same state, with the exception that since it had the advantage of the laying queen when we split, it had already progressed to the point of having several queen cells in progress, with larva inside, but not yet capped. We removed the empty plasticell super and added a full super of empty drawn comb to that hive, too, but it likely will swarm anyway because the queen cells already have larva in them. We have empty equipment set up with drawn comb near the hives, we hope that will serve as a bait hive if it does swarm, but the bees will make up their own minds about that! There is not much we can do to prevent the swarming at this point. It was a great educational moment because all in attendance could clearly see all three types of brood cells – worker, drone AND a queen cell, so they can tell the difference and identify them in their own hives.
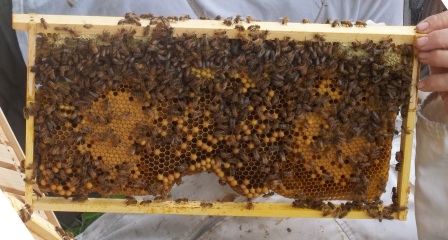
Now, for the moment we had all waited for – to open the horizontal hive and check its progress. The bees had begun to work on the 14th deep frame. The hive had a LOT of adult drones, which we think is a good thing, because they will flood our area with their good genetics, and since this has been an active swarm season, there are a lot of virgin queens out there that will be mated, hopefully by our good drones. This brood frame at right is already in at least its second setting of brood. The worker brood is on the sides with the drone brood in the middle. This is the way the bees have decided to arrange their brood on these foundationless frames. All in attendance were able to see the comb building process, with the bees chaining together to make new wax. The further back combs were filled with uncapped nectar. The bees start small combs in about four places along the top bars, then connect the combs together as they build them down. This leads to an interesting pattern of cells that are not uniformly lined up like they are on foundation. Also, with the lack of foundation, when we hold the frames up to the light, we can see through them. Several members of the club are now quite interested in using this type of hive in the future.
We are going to try to sell our remaining, unused medium depth plasticell frames for $2 apiece, which is what we paid for them, and use the money to buy medium depth foundationless frames to put on the regular Langstroth hives in the apiary. The bees have shown us they don’t like plasticell, and we don’t want to use wax foundation because of the possibility of contamination by miticides because the wax used to make the foundation comes from large, commercial beekeepers that routinely use chemicals to control varroa mites in their hives. This gets into the wax, and then is in the new foundation we put on our hives. Since we don’t want this, we will try natural comb on our regular hives, too, since the bees have demonstrated how much they like it on the horizontal hive.
May 25, 2013
Today Anneliese, Caroline and Elizabeth Abbott and one bee club member came to check the club hives. We checked the horizontal hive first. The bees have gone out to the eighth frame with comb building. They are building all their combs nice and straight and in the frames. It is really incredible to see. Frame #2 and Frame #3 were drawn comb with foundation in them. Those are solid packed with capped brood. The natural comb is more varied, with drone cells in the middle, storage around the edges and worker brood also. They are making a lot of drones, which makes us happy because these are terrific bees and we want their genetics spread throughout our area. We didn’t spot the queen, but we didn’t look too hard for her. Her evidence was very clear, so we were satisfied. Next we opened hive #1, the split that was queenless. We added a box to give them more room. There was pollen going in, everyone was calm and we found new eggs, indicating a new, laying queen! We didn’t feel we needed to disturb them further to spot her since we found eggs. Hive #2 was busy, full of bees and lots of new pollen going in, so we just checked it from the top and left them. Everyone was so calm we did not need the smoker. We will leave everything alone until the next scheduled field day. We may be ready for honey supers then!
May 16, 2013It has been nine days since we installed the package in the Long Langstroth hive. It was a beautiful day. We went out to the club apiary and added a super to each of the splits from the overwintered hive so they have plenty of room. They looked great and had a lot of bees. Now, for the moment of truth, to see how the bees are drawing out the foundationless frames in our Long Langstroth hive.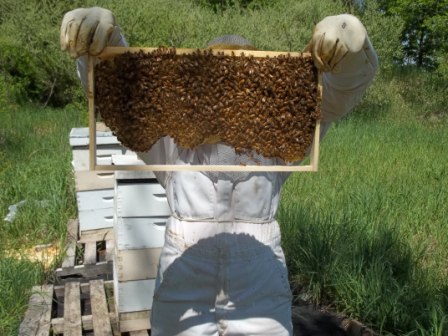 We put two frames of drawn comb in with one empty frame in front, so frame #1 is foundationless, #2 and #3 are drawn comb, #4 is foundationless and so are all the rest. This picture is frame #4. That is all natural comb, completely straight and in the frame! The bees have almost attached it to the bottom of the frame. From the top, it looks exactly like comb built from foundation. Frame number one is almost as full. Frame #5 is half full, so is six and they have started on #7. We did not add any sugar water to this hive, they are doing all this on natural forage. We plan on waiting one week and checking around the 23rd – 25th to see how things are progressing. We may be able to see if our split has successfully raised a queen by then. We did notice they were not nasty at all today, we didn’t even need the smoker, which is a good sign that they have or are indeed raising a queen. Anyone interested in coming out “unofficially” to help with that inspection, contact Caroline.
May 7, 2013
Caroline Abbott, Elizabeth, Laura and Tim Abbott and nine club members attended our first scheduled field day of the year. We had one Carniolian package from AWS bees to install. We chose to install it in our new Long Langstroth horizontal hive. In the hive we had two drawn brood combs and all the rest of the frames are the foundationless frames from Walter T. Kelley Co. Before the installation the attendees assisted in leveling the hive to make sure the comb the bees make in the foundationless frames will be straight. We then opened the front third of the hive with the two drawn combs in it to install the package. The bees had encased the queen cage in so much comb we had to remove the side screen from the package box to get the queen cage out. We dumped all the bees into the hive because it is up on a tall stand. We direct released the queen, she ran right down into the hive between the top bars. We felt this was safe because she had been with the bees for several days, and they had built so much comb for her, they must have accepted her. Since the dandelions are in full bloom and there is a lot of other bloom going on right now, we opted to not artificially feed. We started at 8:00 pm, so our observations of the other two hives were limited because they were not as active at that time of day.
Hive #1 – the queenless hive in the original position of the overwintered hive had so many foragers trying to get in for the night, the entrance was stuffed with bees. They look really good.
Hive#2 – The split with the queen had foragers returning with lots of dandelion pollen, indicating that she is busy rearing brood. That hive looked good, too.
Future plans: We will check in the horizontal hive in a couple of weeks to see how the comb building is coming along and to make sure the queen has a good laying pattern. We will try not to disturb the other two hives until the next field day to allow them plenty of time to raise a new queen and get her mated and started rearing brood. We will keep an eye on them from the outside to make sure everything looks good. If we think the queenless hive needs more room, we will add a box, since the foragers were stuffing the entrance at night. The next field day will demonstrate a routine hive inspection.
Date: April 27, 2013We called a special field day on extremely short notice because the weather was exceptionally good and we needed to thoroughly check the hive that had overwintered. We had been told that Carniolians can build up really fast and need to be watched closely in the spring. Only one person was able to join us for the inspection, but that was OK, we needed to take advantage of the weather. We had set up the long hive yesterday and got it leveled and ready to go for the package when it arrives. We added two drawn frames of comb to it today to help the package draw out straight comb and to give the queen somewhere to lay when they first come. We also thought it might serve as a bait hive just in case our other hive or any others nearby decided to swarm. We checked the over-wintered hive and found it very strong, with drones and queen cups started, which indicated it was ready to split. We set up a bottom board and hive stand for the split and started looking for the queen. Fortunately after much searching we found her! We put the queen in the split and made sure she had plenty of extra room and an extra box of brood. We left the queenless hive in the place the hive originally was so all the returning foragers will go there. We put a frame of young brood with eggs in the middle of the brood nest with three cells with eggs notched so they will raise their own queen. We will not open that hive for four weeks, allowing them to raise a new queen and for her to mate and begin laying eggs.
April 16, 2013Today the daffodils were blooming and the sun was shining and it was around 55°. We apologize that we did not schedule an official field day to check the hives, but since we have only had one sunny day in the past nine or so, we had to take advantage of it and do it when the weather cooperated. As we expected, hive #1, the Italian overwintered hive from last year was dead. However, the surprising part was that there were very few dead bees in the hive, even on the bottom board. This suggests to us that the silly bees must have swarmed late in the season, because it was a very strong hive in the summer with a large population. There were two full supers of honey and one partially full. Hive #2, the Carniolian hive looked very good. We removed the wood chip box, and there were a lot of bees busy about their work in the hive. We added a box of mostly empty comb to give them some room until the weather gets better and we can really check them thoroughly. We also gave them one of the full supers of honey from the dead hive.
We do not think the wood chip boxes were necessary because they were completely dry, which suggests that our other ventilation was sufficient and that the wood chips were not neccessary to absorb excess moisture. It was a good experiment, but we will probably not repeat it next year.
We plan to install the Long Langstroth, horizontal hive in the club apiary on the next field day. We will install our Carniolian package in that hive. We will probably use honey from the dead hive instead of sugar water when we install since we have it. We have received a total of 50 foundation-less frames to use in this hive. So far we have assembled ten, but will have enough ready to start the hive when the package arrives. We will use some drawn comb to help them make straight comb, and to give the queen a place to start laying right away. There is a total of four boxes of drawn deep comb in the club apiary, so we can use as much as we want. We will probably use ten, and then mix in the foundationless frames to encourage straight comb building.
March 23, 2013A group of beekeepers with a special interest in top bar beekeeping met at Caroline Abbott’s home. We discussed top bar beekeeping and Caroline introduced a horizontal Langstroth hive, or a Long Langstroth hive, which was built by club member Ken Hoekstra. The hive is four feet long and will fit 42 Langstroth deep frames. It will be managed the same way as a top bar hive, with the exception of using frames instead of just top bars. We have ordered special “foundation-less” frames with wood starter strips to guide natural comb building by the bees. It is our intention to install this hive in the club apiary and install a package of Carniolians on our first field day in April. The purpose of this hive is to help those wanting to keep top bar hives, by using similar techniques in the club apiary. Also we are experimenting with this hive for two specific reasons: To encourage natural comb building to avoid contaminants in foundation and also to make a hive that is easier to manage for those who are not strong or physically able. We want to increase accessibility to beekeeping to those who may not be able to handle lifting heavy supers off vertical hives.
March 7, 2013Hive #1 & 2
Condition of hive: Hive #1 is the Italian hive which overwintered last year, originally a Georgia package. It was cold today, but mild, so we did not do anything but observe from the outside. Hive#1 had no visible signs of life, i.e. fresh dead bees in the snow in front of the hive, and no discernible buzzing when listening close to the hive body. Hive#2 is a Carniolian hive started from a northern California package last April. Hive #2 had evidence of life, i.e. fresh dead bees in the snow in front of the hive and we could hear buzzing in the hive when we listened closely.
Activities done to the hive: Since it was cold, we did nothing to the hives, but we are making an assumption right now that Hive#1 did not survive the winter, but so far Hive #2 seems to be doing well.
Notes on future hive needs: We will keep an eye on the hives. When the weather warms up we will determine for sure who is alive and who is dead. The Carniolians are darker, so it should be easier to see if any activity on the Italian hive is just robbing, or not. We will not attempt a complete hive inspection until the daffodils bloom.